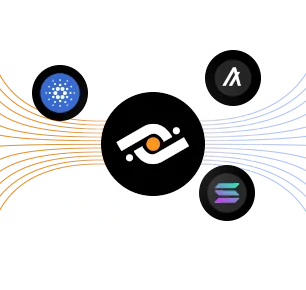
相互運用性とL2の拡張性を実現

Milkomedaは広く利用されるスマートコントラクト言語、"Solidity"を活用することで、主要なレイヤー1エコシステムにロールアップ技術を提供し、レイヤー2レベルでのブロックチェーン間の相互運用性、ユーザーエクスペリエンス、開発者の推進力を高めます。

oval-top
oval-top

Select what defines you best

What is Milkomeda?

Milkomeda allows Apps to work in multiple blockchains. Imagine if any cool Android App could work in your iPhone without any changes!

  • DeFi (分散型金融)

    Stablecoins, DEXes, Money Markets, DeFi 2.0, etc.

    defi
  • ブリッジ

    Algorand、Solana、Cardanoを接続

    bridges
  • ゲーム

    プレイトゥアーンなどのブロックチェーンベースのゲームに対応

    games
  • NFT

    NFTプラットフォームに対応

    nfts

How to connect

Getting Started

The Milkomeda C1 sidechain uses MilkADA as its base asset for paying fees and gas. To access the sidechain, you will need a Cardano wallet with some ADA as well as the MetaMask browser extension.

On the following pages we will walk through the steps to create a Cardano wallet in Flint, configure MetaMask to get a Milkomeda C1 address, and finally send ADA to be converted into MilkADA on Milkomeda C1.

Our first step is to install Flint Wallet. Proceed to the next section to begin.

We have a suite of webpages and tools to help navigating Milkomeda:

Getting a Cardano Wallet (Flint)

Flint Wallet is a Chrome extension that serves as a convenient go-to light wallet for DeFi and NFTs. The current version of Flint allows users to enable "Milkomeda mode" to send transactions to the Milkomeda C1 sidechain. Install Flint Wallet by visiting the following link while using Chrome browser and clicking the “Add to Chrome” button: Install Flint Wallet

After installing, click the "puzzle piece" icon     at the top right of the Chrome window to access your extensions. Select Flint. Within the Flint Wallet window, proceed past the initial warning screen, click “Let’s Begin”, choose your language, click “I agree”, and when you arrive at the screen shown below, click the “Mainnet” button.

Pick a network

Next, click “Confirm”, “Create a new wallet”, and write down a copy of your recovery phrase.

Confirm the recovery phrase at the next screen, set a wallet password, and click “Create my wallet”. For now you can select “Skip” at the App Passcode screen, and then click “Finish”. You should now have a Cardano wallet, as shown:

create flint wallet

Note that to proceed further you will need to fund your wallet with some ADA. Refer to the "Get Help" section at the end of this document if you require assistance or encounter trouble at this stage.

Next, we will configure MetaMask to connect to the Milkomeda C1 sidechain.

Get and Setup a Milkomeda Wallet (Metamask)

The next step is to obtain an address on the Milkomeda C1 sidechain where we can receive our MilkADA. For now, we recommend using MetaMask for this step.

First, install MetaMask for Chrome. Then, click the Chrome Extensions icon     and select MetaMask. Within the MetaMask window, click "Get Started" and then "Create a Wallet". Set a wallet password and click through the rest of the setup screens. When finished, you should have a new empty wallet as shown below. Select the network dropdown at the top right of the MetaMask screen.

Metamask wallet

From the dropdown list, select “Add Network” and enter the following:

Network Name: Milkomeda Cardano (C1)

New RPC URL: https://rpc-mainnet-cardano-evm.c1.milkomeda.com;

Chain ID: 2001

Currency Symbol (Optional): MilkADA

Block Explorer URL (Optional): https://explorer-mainnet-cardano-evm.c1.milkomeda.com

Click “Save”, and you should now see "Milkomeda Cardano (C1)" in the network dropdown. Copy your C1 wallet address to the clipboard by clicking on the account name, as shown.

Copy Address Metamask

Now we are ready to return to Flint Wallet and send our ADA to be converted to MilkADA.

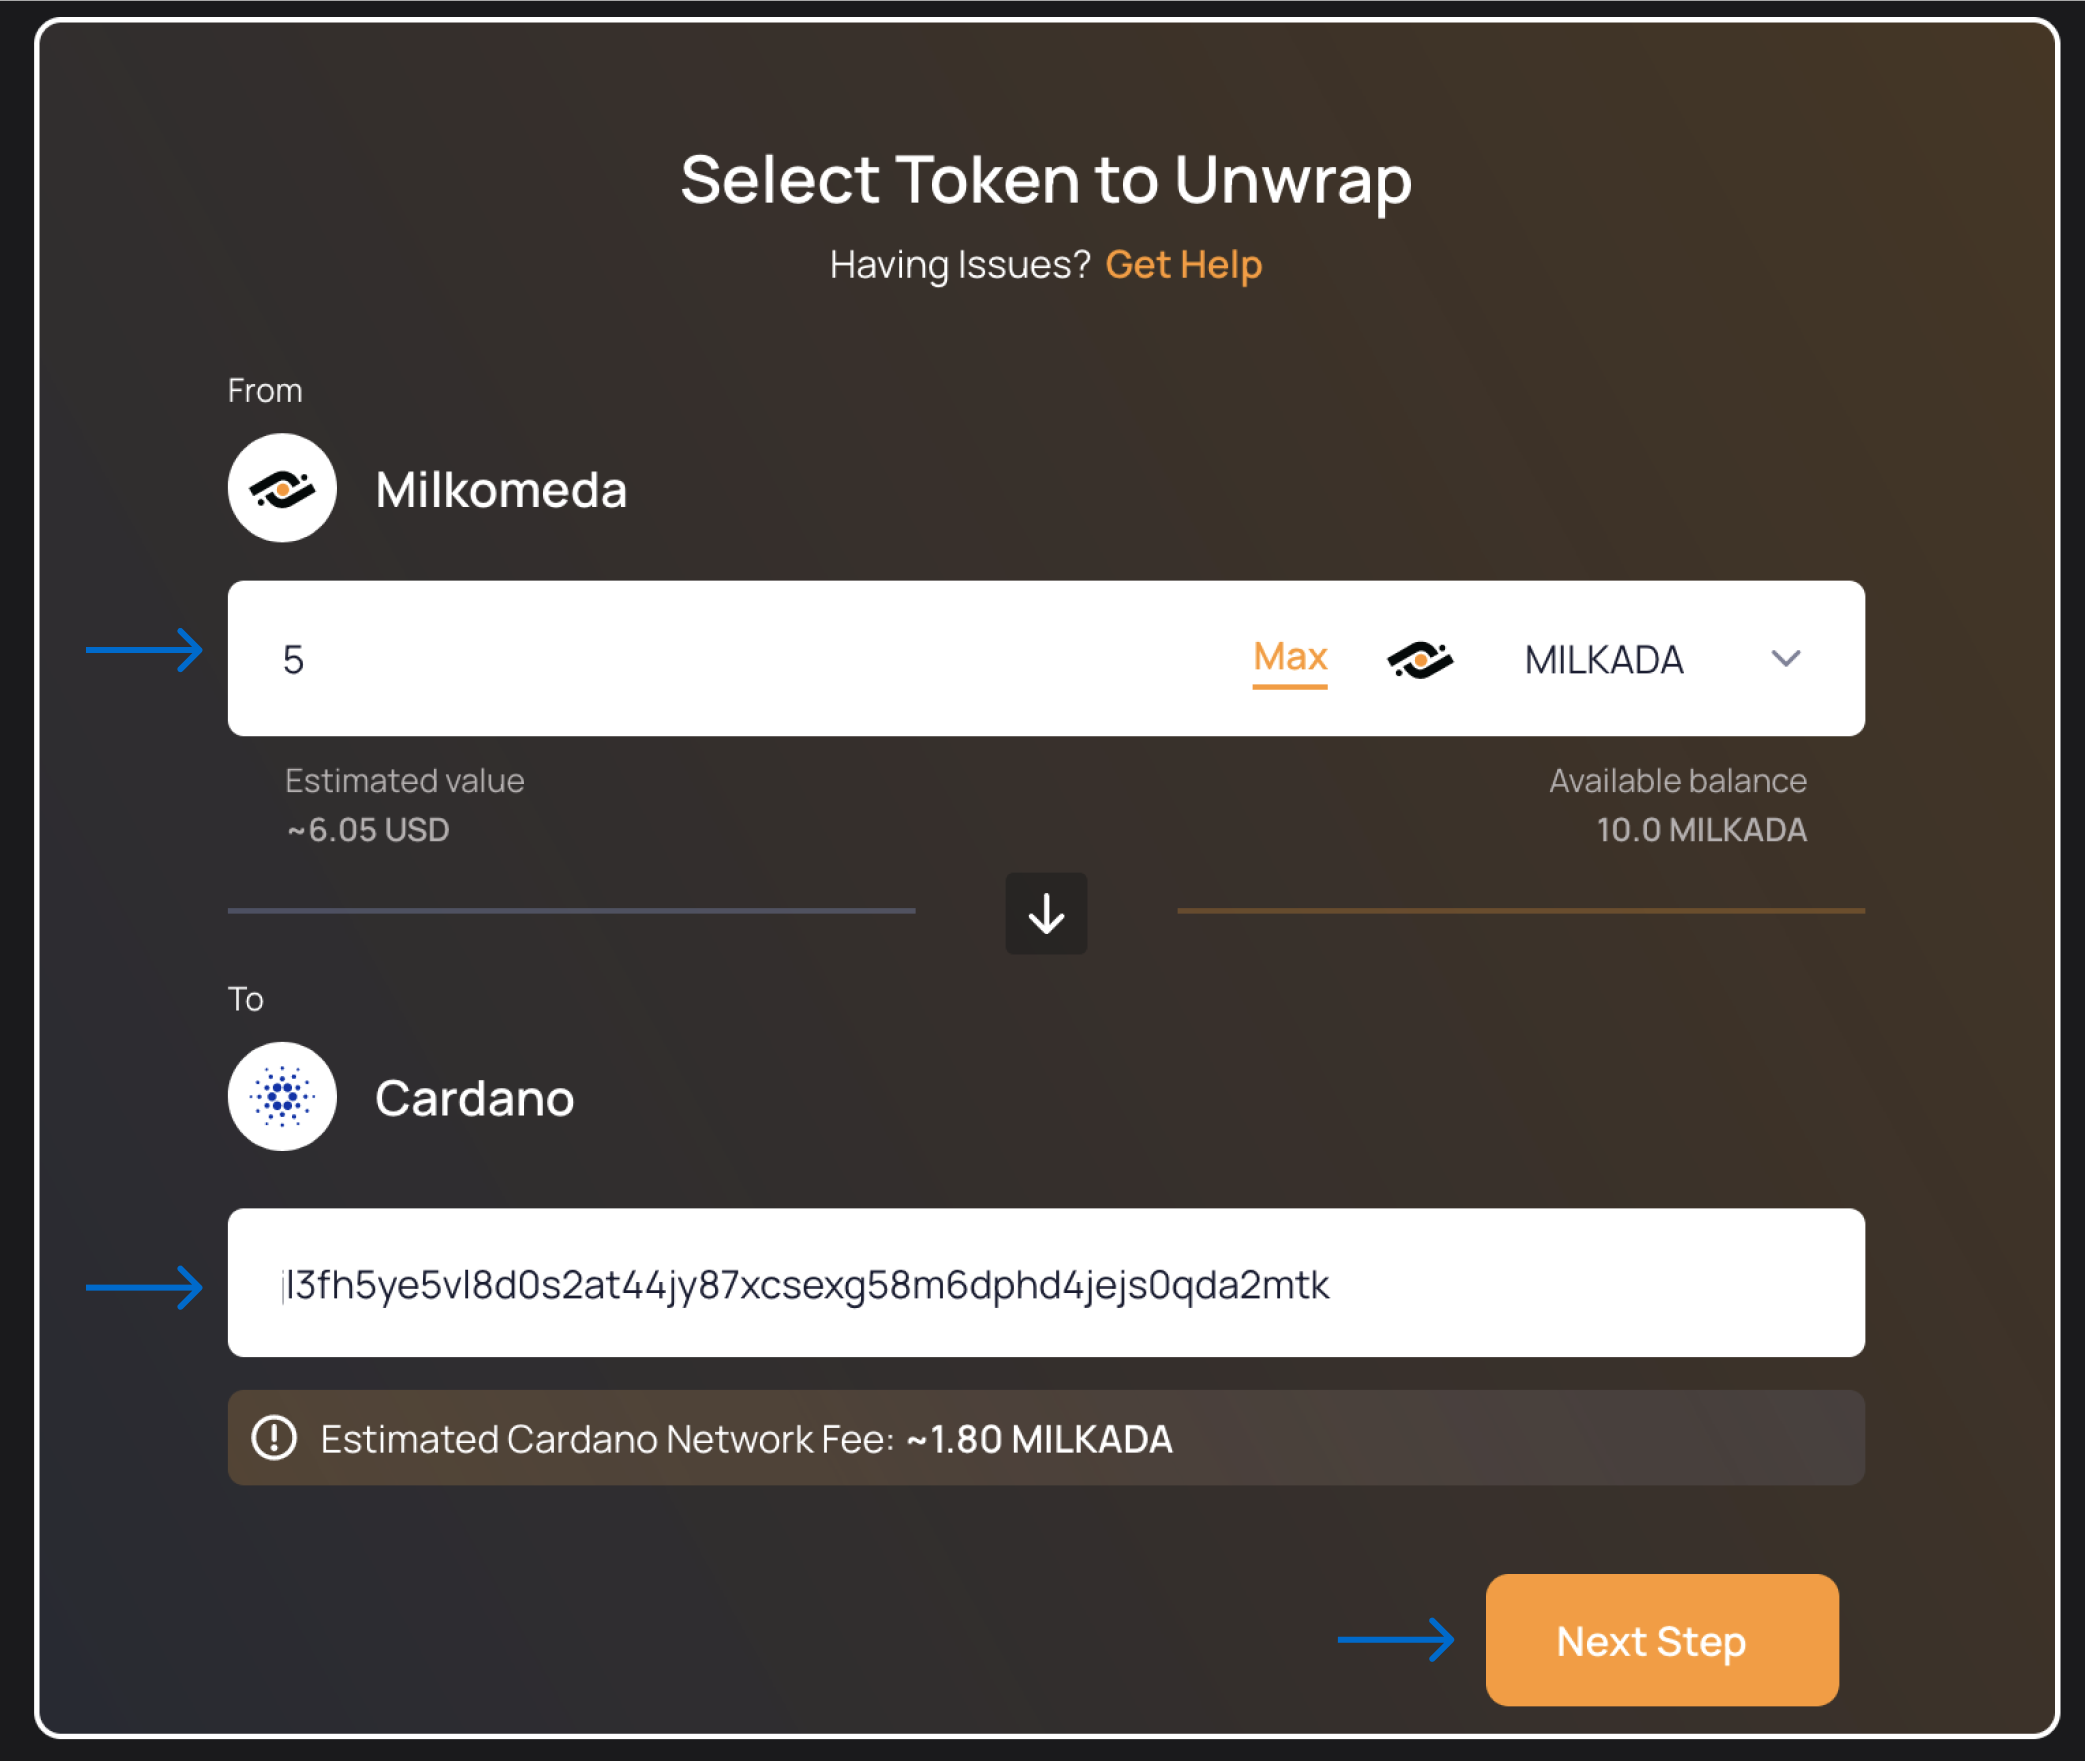
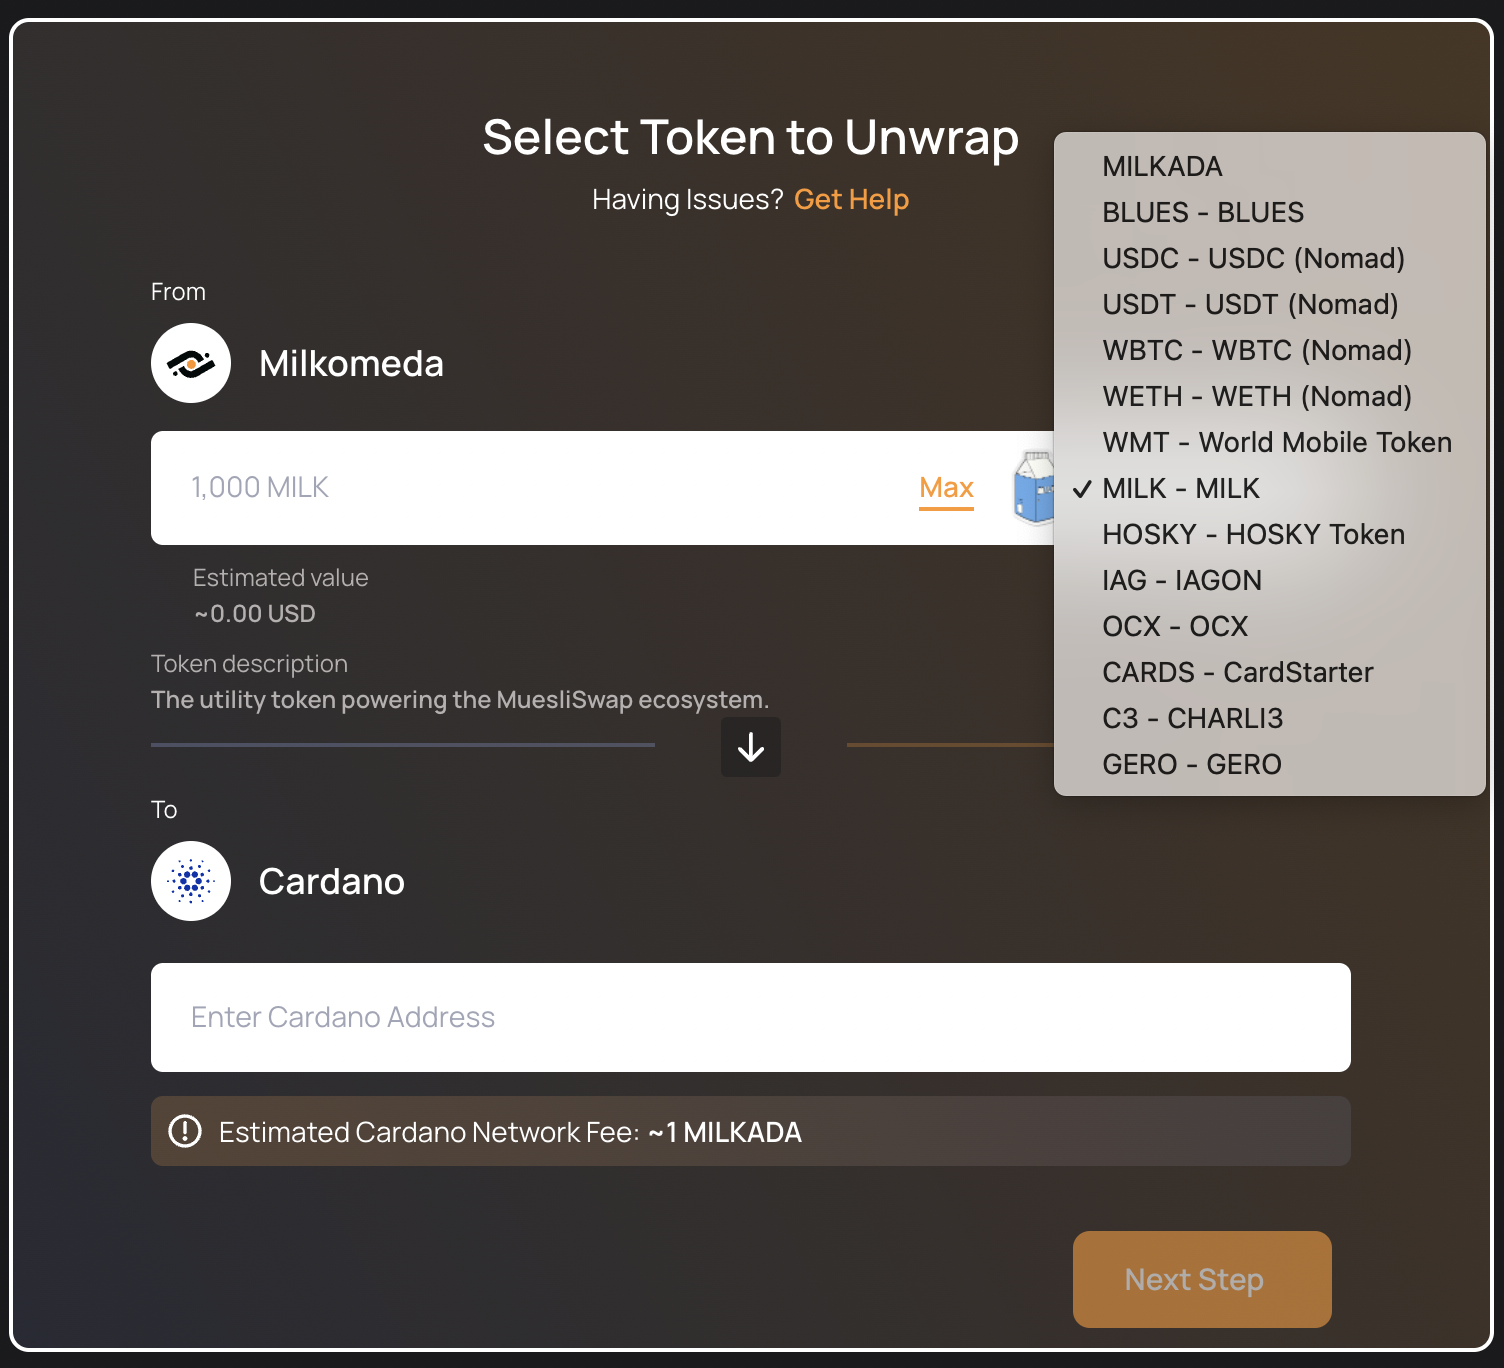
Moving Assets to Milkomeda C1 (Wrapping)

Open the Flint Wallet window and click "Send". At the next screen, enable the "Milkomeda mode" toggle, paste the Milkomeda C1 wallet address currently in the clipboard into the "Milkomeda Ethereum Address" field, and enter the amount to send (1 ADA in this example). Then click "Continue".

Wrapping ADA in flint wallet

At the confirmation screen, enter your wallet password and click "Send".

Wrapping ADA

The transfer will require 10 confirmations, which should take approximately 5 minutes. Once the transaction is confirmed, the transferred MilkADA should be visible in your C1 wallet in MetaMask.

A note on transaction fees

For transactions that take place solely on the Milkomeda C1 sidechain, you only pay the standard Milkomeda network transaction fee set by the block producers.

However, transactions that involve wrapping, i.e., moving assets between Cardano and the Milkomeda C1 sidechain, require payment of transactions fees for both Cardano and Milkomeda since one transaction is required on each chain.

For example, sending assets from Cardano to Milkomeda C1 requires one transaction on Cardano to lock your assets and another transaction on Milkomeda C1 to issue the wrapped assets to you.

When sending a transaction of this type in Flint Wallet, you can expand the "Network Fee" item to see a "Base Fee" (i.e., the Cardano transaction fee) and a "Milkomeda Fee". Note that the "Milkomeda Fee" for these transactions will be slightly higher than the standard transaction fee on Milkomeda since you are also paying the block producers for their role in wrapping your assets.

Now you have successfully wrapped your ADA into MilkADA for use on the Milkomeda C1 sidechain.

About "MilkADA" vs. "Wrapped ADA"

MilkADA is the base asset on the Milkomeda C1 sidechain. When you move ADA to Milkomeda, you receive MilkADA.

Apart from MilkADA, there is another token called "Wrapped ADA" or WADA. Wrapped ADA is an ERC20 token that functions the same as WETH on Ethereum. Be careful not to get these confused!

To check the available list of tokens that can be wrapped, go to Cardano Bridge Supported Native Assets section.

Moving Assets Back to Cardano (Unwrapping)

To move assets from Milkomeda C1 sidechain back to Cardano, use the Milkomeda Cardano Unwrap Bridge. Follow the steps below to unwrap milkADA and receive ADA in your Cardano mainnet wallet.

First, access the Milkomeda Cardano Unwrap Bridge and connect your MetaMask wallet.

Connect metamask

Connect Wallet

Click "Next"

Connect Milkomeda network

Connect to the Milkomeda C1 Sidechain

Remember to select the appropriate network in your wallet.
Only connect with sites you trust. Make sure the website URL is as follows: https://cardano-bridge.milkomeda.com

Next, enter the amount of milkADA to unwrap or click the arrow to select a different asset to unwrap, and paste your Cardano wallet address in the "To" field. Then, click the "Next Step" button.

Sign the transaction for unwrapping the assets in MetaMask by clicking "Confirm".

Confirm Metamask

Next, wait for blockchain confirmation.

Blockchain confirmation

You can check the transaction details in Cardanoscan explorer for more information.

At this stage, the address bar of your browser will contain some information about the unwrapping transaction. An example is shown in the figure below.

Address bar link

The meaning of each of these elements in the address bar is as follows:

  • The EVM unwrapping transaction ID
  • The unwrapped token amount
  • The name of the token being unwrapped

To look up more detailed information about the unwrapping transaction, go to Milkomeda Blockscout explorer and paste the EVM unwrapping transaction ID into the search box, as shown below.

Search box in BlockscoutLook up the example transaction

The unwrapping process is now complete. After waiting for the necessary transaction confirmations, you should see the unwrapped asset in your Cardano Mainnet wallet.

Flint transactions page

To check the available list of tokens that can be unwrapped, go to Cardano Bridge Supported Native Assets section.

Cardano Bridge Supported Native Assets

This section presents all native tokens supported by the Milkomeda Bridge to Cardano. To wrap and unwrap any supported native asset follow the step-by-step tutorial presented in For End Users section by replacing milkADA with any token from the table below.

Please, remember that the specific native asset must be added to Milkomeda Token Registry before it can be used in any of the wrapping or unwrapping operations. Hence, the list is finite and allows only for specific native tokens.

List of supported Milkomeda Native Assets:

When using Milkomeda Cardano Unwrap Bridge for unwrapping a specific native asset, select it from the drop-down list as shown below:

Select native asset for unwrapping

After selecting a desired native asset, you can always check its description (e.g. The utility token powering the MuesliSwap ecosystem when choosing the MILK token)

セキュリティ

Milkomeda’s team treats network security with the utmost importance, making every effort to ensure that the key elements of the system are properly audited. Our team works with trusted and reputable blockchain auditing companies to report on the audit of Milkomeda’s smart contracts.

  • 相互運用可能な未来を切りひらく

    • checkEVM非対応エコシステムのためのコア基盤を展開することで、ロールアップとSolidityのメリットをどちらも活用できます
    • checkEthereumの既存プロジェクトの移植できるため、さまざまなdAppに対応可能です
    • checkZK技術の最新イノベーションをL3+ソリューションとしてMilkomeda上に実装します
    astrounaut
  • 開発者が開発者のために構築

    • checkSolidity (EVM) ベースのスマートコントラクトを数分でデプロイ可能です
    • checkEthereumのあらゆるツールをすぐに利用できます
    • checkMilkomedaをはじめて利用する際に役立つガイドや事例をご用意しています
    touch
  • 豊富な人材、MVP (Minimum Viable Product) 検証による迅速な開発

    • checkCardano、Algorand、Solanaなどのチェーン上での構築に、最大規模のスマートコントラクトコミュニティ (Solidity) の人材・リソースを活用できます0
    • checkコアとなる開発からセキュリティ監査まで、豊富なツールやノウハウを活用することで、迅速かつ低コストでの構築を実現します
    starship

開発者のメリット

  • racket

    構築後は多様なブロックチェーンにデプロイ可能

    Milkomedaを活用すれば、将来性に優れたほとんどのL1ブロックチェーンでプロジェクトをデプロイできます。修正を加える必要もありません

  • evm

    EVMのすべてのツールを利用可能

    Ethereumと同様の構築、デプロイ、デバッグ、監査を実現します

  • security-consistency

    デプロイメント間のセキュリティの整合性を実現

    複数のチェーンにデプロイされたコードのセキュリティに関するプロパティを統一します。チェーンごとに監査する必要はありません

  • start-building-right-now

    すぐに構築が可能

    MilkomedaのサイドチェーンであるCardanoテストネットとメインネットはすでに稼働中です

    こちらのガイドをご覧ください

oval-top

最新情報をチェック

ご登録のメールアドレスにMilkomedaの最新情報を配信

最新の情報やプロセス、計画、インサイトを厳選してお届けします